Electric Faucet/Tap Installation Guide
Please follow the installation and operation instructions carefully, to ensure the long life and reliable operation of this appliance.
Application
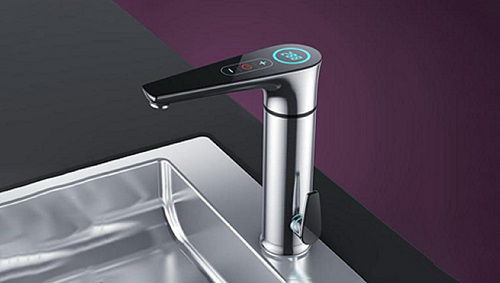
Electronic On Demand Instant hot water faucet is for household and Commercial use. It can be used for kitchen sink and basin. It is not suitable for shower.
Operation Instructions
| 1 |
|
| 2 |
|
| 3 |
|
| 4 |
|
| 5 |
|
| 6 |
|
| 7 |
|
| 8 |
|
Note: High flow / High water pressure may not dispense desired hot water at set temperature. If so please reduce the water flow to achieve desired hot water
Important Safety Instructions
| 1 |
|
| 2 |
|
| 3 |
|
| 4 |
|
| 5 |
|
| 6 |
|
| 7 |
|
| 8 |
|
| 9 |
|
| 10 |
|
Diagram
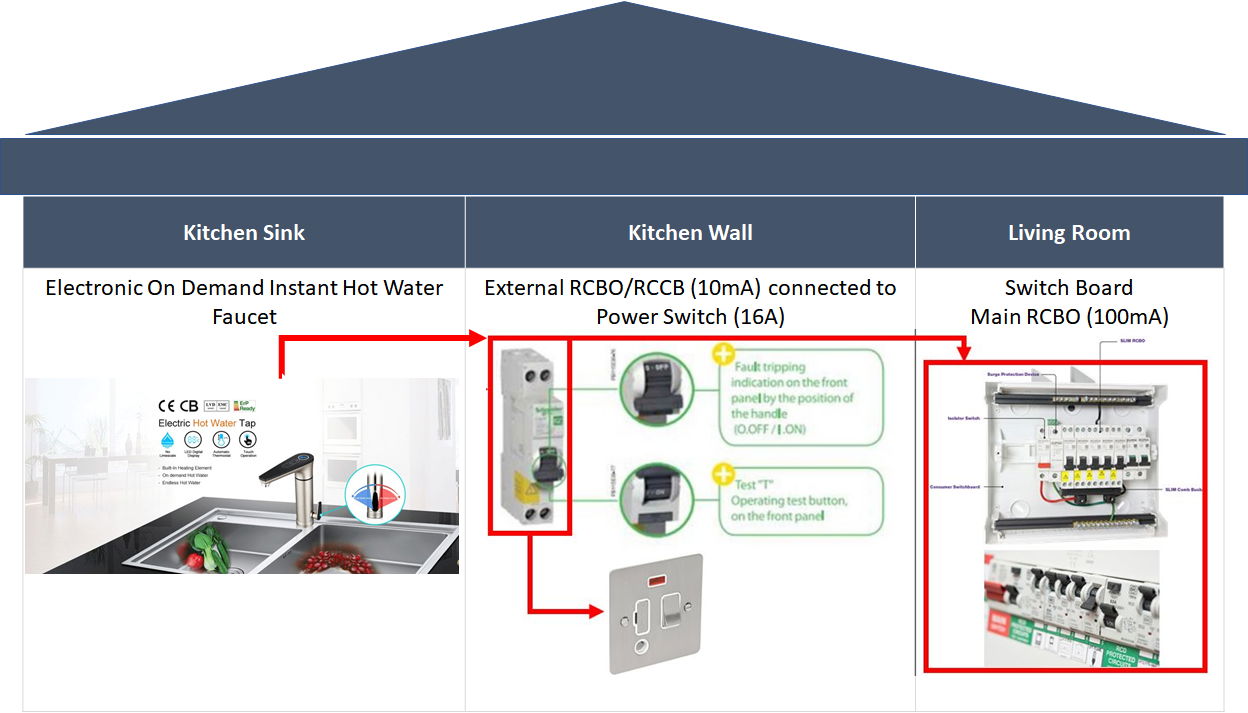
| Electrical diagram |  |
 | Product Inner Structure |
| Display Screen | 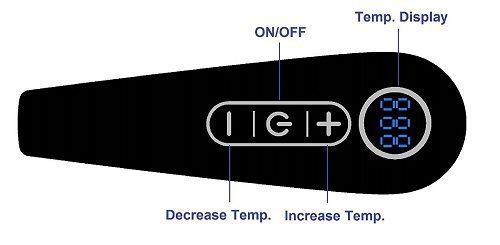 |
Technical data
| Voltage | 220-240v |
| Rated frequency | 50/60Hz |
| Power | 3.3kW |
| Temp. Setting Range | 30-50°C |
| Overheat Protection | 55°C |
| Thermal Cut-out | 65°C(Automatic Reset) 90°C (Manual Reset) |
| Rated Pressure | 0MPa |
| Water Pressure | 0.02-0.6MPa |
| Hot Water Flow | 1L-5L |
| Inlet Connector | G1/2” |
Installation guideline
The installation must be in compliance with the National Electrical Code, your local electrical and plumbing codes.
| 1 |
|
| 2 |
|
| 3 |
|
| 4 |
|
| 5 |
|
| 6 |
|
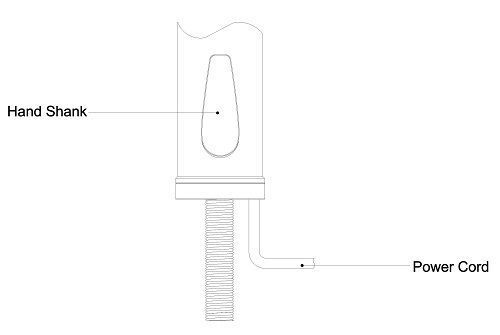
Installation Diagram:
Installation Method
1→ The appliance can fit 2 different mode of power connection, 1) power connection is above the table-board; 2) power connection is below the table-board; Please confirm the power connection mode first. Below are the installed assembly drawing | |
| Fig 1-A power cord connect above the table-board |  |
 | Fig 1-B Power cord under table-board |
2→Make the water inlet connection pass through the pedestal, place the power cord into the cavity of pedestal. Please refer below Fig 1-A and Fig 1-B | |
| Fig 2-A power cord connect above the table-board |  |
 | Fig 2-B Power cord under table-board |
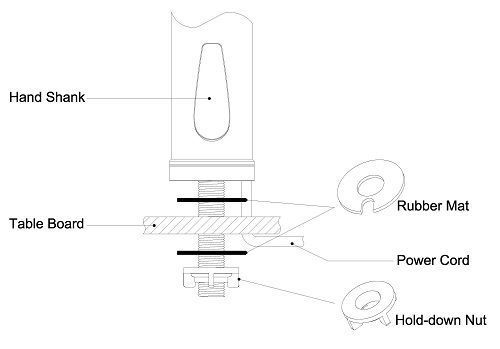
3→Make the water connection pass through the rubber mat, please notice there is a cavity at the rubber mat to fit the power cord | |
| Fig 3-A power cord connect above the table-board |  |
 | Fig 3-B Power cord under table-board |
4→Make the water inlet connection pass through the hole in table-board, If the power cord need to be connect above the table-board, please keep the cable above the table; please refer to Fig4-A; If the power cord need to be connected under the table-board, please make the cable pass through the hole in table-board. Please refer to Fig4-B; | |
| Fig 4-A power cord connect above the table-board |  |
 | Fig 4-B Power cord under table-board |
5→Fix another rubber mat to the inlet connection under table-board, make sure the rubber mat completely touch the back surface of the table-board | |
| Fig 5-A power cord connect above the table-board |  |
 | Fig 5-B Power cord under table-board |
6→Fix the hold-down nut to further fasten the tap under the table-board | |
| Fig 6-A power cord connect above the table-board |  |
 | Fig 6-B Power cord under table-board |
7→Connect the inlet water pipe, please remember to fix a filter net inside the nut of water pipe, please make sure the water is turned off | |
| Fig 7-A power cord connect above the table-board |  |
 | Fig 7-B Power cord under table-board |